

Beginners guide to Showjumping Course Design
By Christine Bullock.
When I first became involved in Show Jumping Course Design almost 20 years ago the attitude was fairly rough and ready. Make it high, make it hard, sort them out. There is no place is this sport for those who are not ‘up to standard.
About that time visiting Americans and Canadians called for a much softer attitude to course building.
It was one of encouragement and help, with the idea to build a young horse's and new rider's confidence.
This to me made great sense. When running horse shows the rings with the lower heights make up with the bulk of the competitors including recreational riders and young horses. These rings make up the backbone of these shows.
If you are interested in learning how to build courses that encourage young horses to jump and complete their rounds here are a few pointers.
I have found that there are a certain RULES to adhere to. If you follow them it is amazing how well a beginner horse or rider will jump. Showhunter designs generally have a good basic approach, but remember that a showhunter combination has a chance to practice their lines and jumps at the beginning of the day. Showjumpers do not have that luxury. It is therefore paramount that designers take special care with their courses.
In my experience courses up to 1.10m have to be designed carefully; after that riders and horses are more experienced so some of the rules can be bent, but only by experienced coursed designers. However some basics such as related distances ,good corners and sensibly placed doubles are always best to follow.
Guide lines
- Jump one Jump one and possibly two should always run down toward the entrance gate. There should be no exceptions at this level. Horses are happy to jump toward home. Always have plenty of rails in jump one and make it an easy rising oxer (spread) so the jump looks substantial thus encouraging the horse to make a good jump. It is allowable and good practice to set this jump 5cm below the stated height for the class. WE MUST get them over number one! No fancy filler boards or pickets just rails.
- The first jump going away from the gate The first jump away from the gate be it jump 2, 3 or 4 is also a very significant jump. It is essential it has no little pickets, fillers or walls, just plain rails. It is hard enough for the young horse to cope with leaving its friends without giving it more questions. This is usually the hardest jump on the course for the horse so it is best we make it user friendly.
- Corners Allow plenty of room on the corners for the young horse to come round. The good rule of thumb is allow three horse strides for the horse to recover from landing, three strides to negotiate the corner and three strides to set itself up for the next jump. A horses stride is 12 feet or 3.65 metres. I find if you count 45 of your walking strides round a corner then that will be enough.
- Reverse Turns
Avoid reverse turns as it is very hard for a rider to judge their line or stride to the next jump.
Thus - Dog legs
Dog legs are when the jumps do not line up or there is no real flow between them. Avoid dog legs.
There are two changes of leads involved in these. Really hard! - Doubles
Doubles require careful placement. They should be placed on flat and even ground and not before jump 5. Avoid placing them just in front of the judges' truck or next to any other busy area at the arena’s edge. Placing a double to go directly away from the gate is an added difficulty. It makes the young horse think backwards and then shorten his stride thus making it hard for him to make the stride required.
Placing the filler at the second element of a double when one has not been placed at the first also can cause great strife. If the "A" element is too empty with just rails and the "B" element has a lovely bright filler board, there is a huge risk that young horses will be concentrating so hard on the filler that they will not see the first jump and end up tripping through it. Such combinations should only be set in top level competition.
Two stride doubles are better at the beginning of the season. Allow 24 feet or 7.3 metres for one stride and 36 feet or 10.4 metres for two strides. Avoid having the distance too long at low heights. Having the second element a vertical is much easier that an oxer, because it allows the horse to get out. - Use of Fillers
These require careful placement and designing. Riders and horses are not perfect and some over zealously designed walls can cause huge problems to the horses. In my experience some designs can cause some very nasty stops especially ones that seem to look like large eyes. We once had a board that had large black faces on a blue background, it caused endless mayhem.
Once you have built a few courses and experimented with different types of fill, you will soon get the feel of what works well. Being attuned to what is happening in the ring is a must for a good course designer.
In my experience if rails are used up to jump 5, the horse will begin to get into its rhythm and after that all the scary walls and brushes and pickets can be introduced, seemingly causing little trouble. - Change of Rein It is a good idea to keep the first three jumps on the same rein and change the rein every two or three jumps after that. It is important to check that you have at least 2 changes of rein in a course. Try to get an even spread of both reins.
- Distances The general standard stride length is the 12 foot stride (3.65m). Distances can be a little longer when the jumps are over 1.20m. It is also very important to keep the distances true and measured. If a horse can get into a rhythm on a comfortable stride length, then they seem happy to jump if they can be kept on this stride. A guide for stride lengths can be seen on the Strides Distance Calculator. Strides now has a mobile app for calculating Stride Distances, visit the Apple App Store or Google Play to see more about the Strides Distance Calculator App.
- Trebles These are best avoided but are added in Pony Club events when riders are working towards the S/J Champs. They are not allowed in Area Trials.
- Related Lines
These are jumps with measured 4, 5 or 6 strides between them. Three stride lines are not recommended.
This is a subject that leads to many a heated debate. Wrongly placed they can be a nightmare for young horses. A related distance going directly away from the in gate at jump two or three, with fillers in the second jump of a line can cause young horses and inexperienced combinations all sorts of grief. This is because the horse may shorten its stride and the distance quickly becomes misrelated, with the horse making a horrible jump if he jumps at all.
Related lines running across the arena, down to the other horses or later on in the course work better. Related lines work well in showhunter but remember that they get to practice their lines at the beginning of the day. - Uprights and Oxers Uprights are jumps built in a vertical plane and Oxers are jumps that have both height and spread. People also build triple bars and fans. Builders usually alternate the jumps between vertical and oxer as they go round. It is not a hard and fast rule but you should have roughly the same number of spreads as verticals.
- Number of jumps Nine or ten jumps with a double is adequate at this level.
- FlagsThe start and finish flags must be easy for the combination to get through and on to the first jump. If the judges want to move the flags making the line onto jump one too difficult then move jump one and try and resolve it that way or have someone stand at the flags to indicate to the judge when the riders goes through the flags.
- Heights of FencesThe rule book states that every effort must be made to make sure the jumps are at the stated height as advertised for the class. A tolerance of 5cm is allowed if the gear cannot be quite adjusted to the exact height. Keep to this rule.
Riders know why they have entered classes of a certain height and building higher or lower than what they were expecting defeats the purpose of their entry. - Listen to Riders I have often found that riders tend to know what they are talking when they identify problems. When you are in a hurry to get a course ready for the next class it is very easy to overlook a line, the ropes (someone may have moved them) or a helper may have put a jump up too high.
- Learn From Your Experiences Learn from each course building experience that you have. Try to be attuned to when things do not go well (this happens to the best of us) and try to improve on it next time. Be observant of what does work well.
I hope you will find these guidelines or rules helpful. They are not hard and fast rules but they certainly can give you a basis to set your course designing on the right lines
Christine Bullock
christine_a_bullock@hotmail.com
To take a closer look at more of Strides Software please visit our products page.
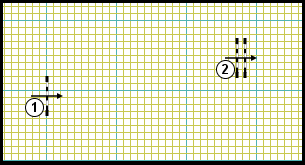
 Reverse turn with the line of the second jump behind the line of the first is preferable.
 Avoid setting a reverse turn with the line of the second jump in front the line of the first jump.
Dog leg corners that require multiple changes of rein between fences a real rhythm breakers and must be avoided at all times.
Get the Strides Distance Calculator app:
'
![]() '
'
![]()
See the latest Strides Course Design tutorials, visit Strides Tutorial Series on our News page:
Tutorial 1 - 3 stride - 20m rule
